Building Stable Applications Against a Dynamic RabbitMQ Cluster
In this post I basically talked about:
- how to simulate a dynamic RabbitMQ cluster locally to test against;
- my thoughts on how to build stable applications against a scalable RabbitMQ cluster
Prelude
Recently at work, one of our system experienced issues during an auto-scaling event of our production RabbitMQ cluster. Fortunately this is during its A/B-testing phase and we quickly switched off the usage of RabbitMQ and things went back to normal that day. The RabbitMQ cluster is deployed using the rabbitmq_peer_discovery_aws plugin with AWS Auto Scaling. And we use durable queues, however as the documentation suggests, they only survive broker restarts, but nodes of our clusters come and go, not down and up.
Our initial “fix” was on RabbitMQ side, where we added HA policies to all queues suspected to be affected by this. However, I myself was not convinced this is necessary. Thus begins my quest of making applications resilient to such kind of cluster changes. In this post, I’ll show how to make a RabbitMQ cluster locally using docker. With that, it’s easy to make all sorts of changes to the cluster and observe (then improve) how an application behaves.
Why Bother?
When we try to maintain a long-lived connection, it’s obvious we need retries like reconnect sockets when failure is detected. Retrying is (in comparison) straightforward for a single node setup since everything fails at the same time, you have to rebuild everything anyway - we often just test against such failure during development and call it a day when resetting all the things simply works.
However, if the live environment runs a distributed system, work is distributed across different nodes, and different components can fail individually. Sometimes, this will cause errors that never happen in a single node setup. Like the error we encountered, something about “home node is down” - the node managing the queue is down (removed in an auto-scaling event), however the other nodes still holds their existing connections just fine.
My test application is in Elixir, but the testing steps here (and the conclusions) apply equally for any other language, and can even extend to any distributed system than just RabbitMQ. But first and foremost this post should be helpful when you work with a RabbitMQ cluster (instead of a single node setup).
Setup the Cluster
So my plan is to set up a local RabbitMQ cluster, I’ll try to explain why I need each command/argument, hopefully making this post useful for a longer period and open it up for other use cases.
First I created a bridge network, this makes clustering RabbitMQ a lot easier, because:
Containers connected to the same user-defined bridge network automatically expose all ports to each other, and no ports to the outside world.
docker network create rabbit
Next I start the first RabbitMQ node, the application will connect through this node. Also I prefer using the management UI to observe things on RabbitMQ side.
docker run -d --network rabbit --name rabbit1 \
  -p "5672:5672" -p "15672:15672" \
  -e RABBITMQ_NODENAME="rabbit@rabbit1" \
  -e RABBITMQ_ERLANG_COOKIE="adfsder" \
  rabbitmq:alpine
Here’s the reasoning behind each argument, also check out the official README for more configurations:
-d starts the container in the background, so I don’t have to dedicate a terminal window/pane for each node
--network rabbit uses the bridge netowrk I just created, all ports are exposed within this network
--name rabbit1 this is the container name for working with it through further docker commands, but more importantly, it also serves as the DNS name within the bridge network, so other nodes can reach it with this name
On a user-defined bridge network, containers can resolve each other by name or alias.
-p expose the non-TLS AMQP port and the management UI to my host - so my test application and browser can access them
-e RABBITMQ_NODENAME="rabbit@rabbit1" explicitly set the node name, which is extremely important for Distributed Erlang to work correctly and RabbitMQ uses Distributed Erlang under the hood. Basically, from the second container, we (DNS) resolve the first container through its name “rabbit1”, which would assume any Erlang node running in the first container to be registered as <something>@rabbit1, if that’s not the case it will complain and refuse to connect:
DIAGNOSTICS
===========

attempted to contact: [rabbit@rabbit1]

rabbit@rabbit1:
  * connected to epmd (port 4369) on rabbit1
  * epmd reports node 'rabbit' uses port 25672 for inter-node and CLI tool traffic
  * TCP connection succeeded but Erlang distribution failed

  * Hostname mismatch: node "rabbit@f0a7d98bd911" believes its host is different.
    Please ensure that hostnames resolve the same way locally and on "rabbit@f0a7d98bd911"
-e RABBITMQ_ERLANG_COOKIE="adfsder" this is equally important for correct clustering in Distributed Erlang - different nodes need to have the same “cookie” to connect. Note this is not a security feature, but more like a “fool-proof” mechanism. Just use the same value across all docker run commands, specific value does not matter.
rabbitmq:alpine I use the alpine image just because it’s small (to download and load - I guess) and there’s no issue I can tell from my test. Feel free to use other variations if it bothers you.
Now I have a running RabbitMQ node, before making a cluster, I also need some basic things there: enable the management plugin, and add a virtual host for testing (not really required). To make a long story short, use the container name to address in which container to run the CLI tools.
docker exec rabbit1 rabbitmq-plugins enable rabbitmq_management
docker exec rabbit1 rabbitmqctl stop_app
docker exec rabbit1 rabbitmqctl reset
docker exec rabbit1 rabbitmqctl start_app
docker exec rabbit1 rabbitmqctl add_vhost xyz
docker exec rabbit1 rabbitmqctl set_permissions -p xyz guest ".*" ".*" ".*"
You should refer to official documentation on these commands, but RabbitMQ has really good CLI diagnostic output as well (as seen above), so you should be able to figure out easily if you missed some step.
Next up we start the second node and connect both nodes to make a cluster.
docker run -d --network rabbit --name rabbit2 -e RABBITMQ_NODENAME="rabbit@rabbit2" -e RABBITMQ_ERLANG_COOKIE="adfsder" rabbitmq:alpine

docker exec rabbit2 rabbitmq-plugins enable rabbitmq_management
docker exec rabbit2 rabbitmqctl stop_app
docker exec rabbit2 rabbitmqctl reset
docker exec rabbit2 rabbitmqctl start_app
docker exec rabbit2 rabbitmqctl stop_app
docker exec rabbit2 rabbitmqctl join_cluster rabbit@rabbit1
docker exec rabbit2 rabbitmqctl start_app
This is mostly the same as the first node, however I didn’t expose any ports to my host (same port is already occupied by the first node, you can use different ports, but that’s not really useful). And no need to make virtual host or configure permissions again, these are shared across a cluster.
The only addition is the join_cluster command. This should in effect be identical as how RabbitMQ’s peer discovery plugins work.
The Test
Now the cluster is ready, let’s think about the test scenario:
- The application connects through the first node
- The durable queue lives on the second node
- Make (bad) things happen to the second node
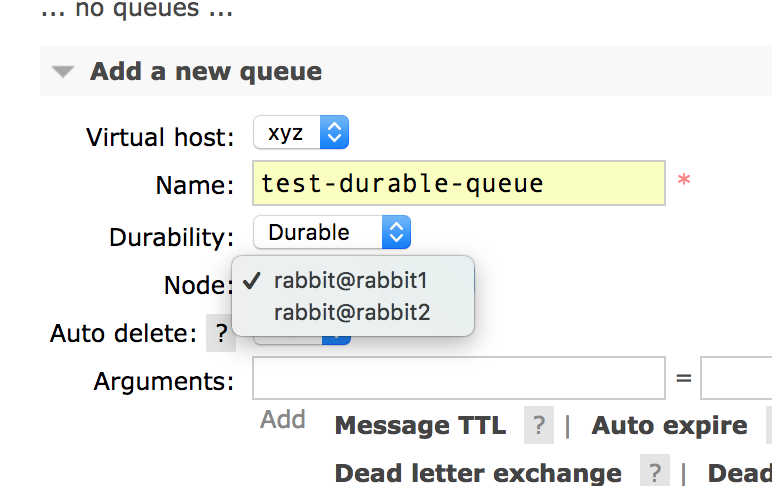
In RabbitMQ, queues are declared through a channel. If a queue doesn’t exist yet, it will be created (and live) on the same node as the declaring channel (if not specified configured). So we need to make the queue somehow on the second node before the application connects and tries to declare the queue on the first node. Luckily, this is very easy through the management UI, expand the “Add a new queue” section from the local management UI and choose a different “node” (refresh the page if “node” is not there)
Now we can start the application to be tested, and make sure everything works normally.
Next we simply need to shut down the container running the second node. We can either:
docker rm -f rabbit2which also does cleanup, this is not recoverable; ordocker stop rabbit2which leaves the node possible for later recovery withdocker start rabbit2
As discussed before, nodes in our live (and dev) RabbitMQ cluster are not “reused”. So to simulate AWS auto-scaling kicking a node off the cluster, I prefer the first command. Of course you should also try out the second scenario and make sure your application recovers as well as the cluster.
As soon as the second node is gone, you should observe the “home node” error:
13:44:45.079 [warning] <<0.241.0>> basic_cancel (queue down?): %{consumer_tag: "amq.ctag-yHVNknmS3kKmOtJtT4XNKQ", no_wait: true}
13:44:55.080 [notice] <<0.241.0>> trying to declare
13:44:55.087 [warning] <<0.241.0>> declare failed: {{:shutdown, {:server_initiated_close, 404, "NOT_FOUND - home node 'rabbit@rabbit2' of durable queue 'test-durable-queue' in vhost 'xyz' is down or inaccessible"}}, {:gen_server, :call, [#PID<0.257.0>, {:call, {:"queue.declare", 0, "test-durable-queue", false, true, false, false, false, []}, :none, #PID<0.241.0>}, 60000]}}
13:45:05.091 [notice] <<0.241.0>> trying to declare
And now you can use this test case to make sure your application stays stable during such failure cases. This is the first test case.
After you make sure the application doesn’t go crazy during this period, you can move forward to the next step, testing whether it can successfully recover when the cluster recovers.
It can “recover” in 2 ways: the downed node comes back up and re-join the cluster; or the remaining cluster decides the dead node does not belong to the cluster anymore. As mentioned before, our clusters are controlled by AWS Auto Scaling, aided by the rabbitmq_peer_discovery_aws plugin, as a result new nodes are added into the cluster and old nodes are just removed from the cluster - essentially the second way just mentioned. To simulate this behaviour in our local cluster, we tell the remaining alive node to “forget” the second node from the cluster.
docker exec rabbit1 rabbitmqctl forget_cluster_node rabbit@rabbit2
As soon as this happens, the application should be able to redeclare the queue - of course you need to make sure it doesn’t crash itself completely prior to this.
13:49:05.254 [notice] <<0.241.0>> trying to declare
13:49:05.256 [warning] <<0.241.0>> declare failed: {{:shutdown, {:server_initiated_close, 404, "NOT_FOUND - home node 'rabbit@rabbit2' of durable queue 'test-durable-queue' in vhost 'xyz' is down or inaccessible"}}, {:gen_server, :call, [#PID<0.360.0>, {:call, {:"queue.declare", 0, "test-durable-queue", false, true, false, false, false, []}, :none, #PID<0.241.0>}, 60000]}}
13:49:15.261 [notice] <<0.241.0>> trying to declare
13:49:15.263 [warning] <<0.241.0>> declare failed: {{:shutdown, {:server_initiated_close, 404, "NOT_FOUND - home node 'rabbit@rabbit2' of durable queue 'test-durable-queue' in vhost 'xyz' is down or inaccessible"}}, {:gen_server, :call, [#PID<0.364.0>, {:call, {:"queue.declare", 0, "test-durable-queue", false, true, false, false, false, []}, :none, #PID<0.241.0>}, 60000]}}
13:49:25.268 [notice] <<0.241.0>> trying to declare
13:49:25.271 [warning] <<0.241.0>> declare failed: {{:shutdown, {:server_initiated_close, 404, "NOT_FOUND - home node 'rabbit@rabbit2' of durable queue 'test-durable-queue' in vhost 'xyz' is down or inaccessible"}}, {:gen_server, :call, [#PID<0.368.0>, {:call, {:"queue.declare", 0, "test-durable-queue", false, true, false, false, false, []}, :none, #PID<0.241.0>}, 60000]}}
13:49:35.273 [notice] <<0.241.0>> trying to declare
13:49:35.281 [notice] <<0.241.0>> declare succeed!
13:49:35.283 [notice] <<0.241.0>> consume succeed!
13:49:35.283 [notice] <<0.241.0>> handle_info: {:basic_consume_ok, %{consumer_tag: "amq.ctag-gnPD_-zSXFWdKik1Thmbtw"}}
This is the second test case and should complete our test around durable queue in a RabbitMQ cluster. At this point, we can conclude that for a durable queue, as long as the old node it lived on is removed from the cluster, we can redeclare it immediately.
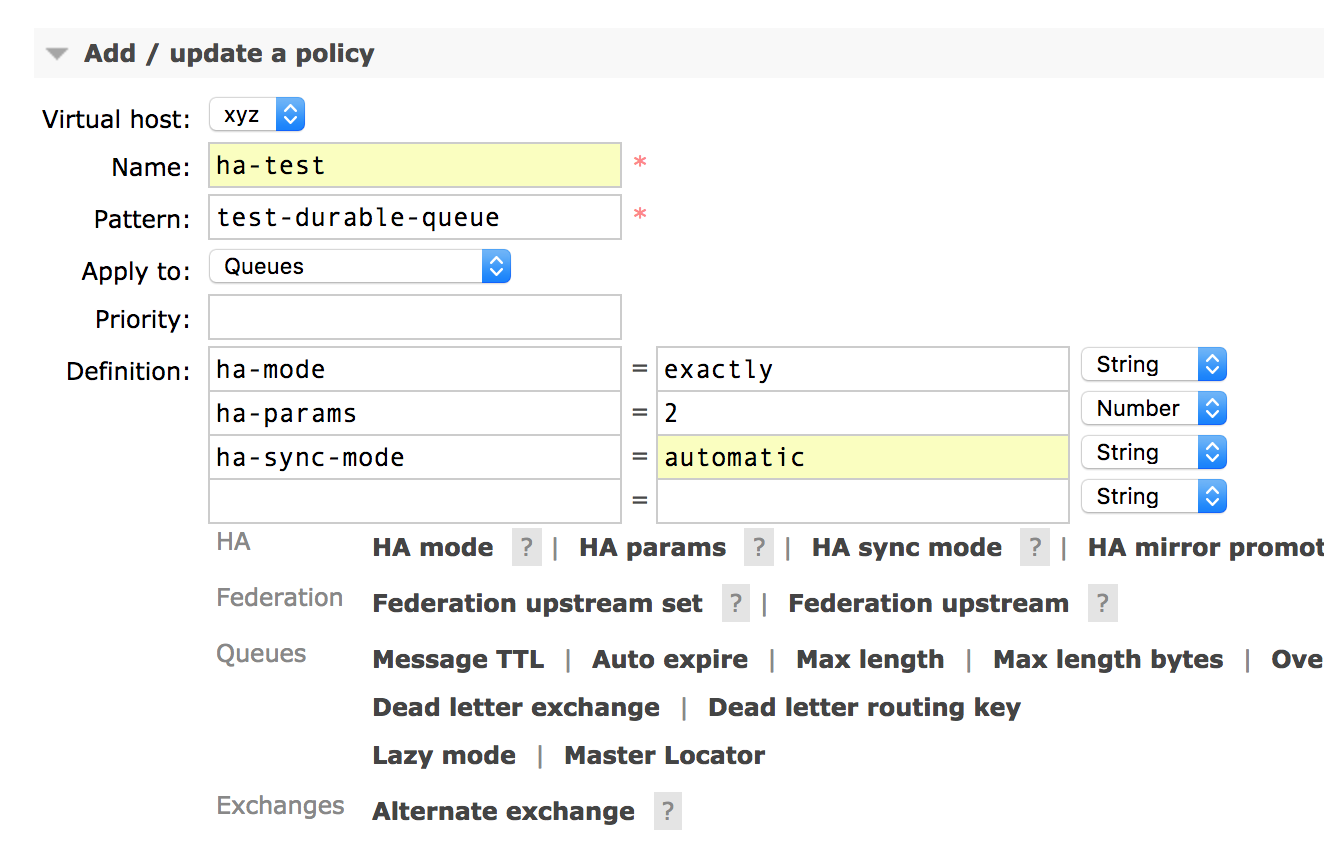
Which means putting HA policies is not really necessary, as long as you don’t mind the period where the dead node is being removed from the cluster. However HA policy does smooth this experience, we can try it out in our local cluster as well.
First, reset the cluster to a 2 node setup and manually create the queue on the second node. Then add a policy from the management UI:
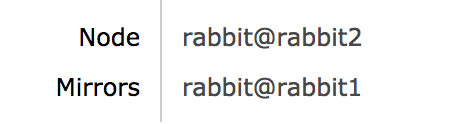
And observe the queue is now mirrored:
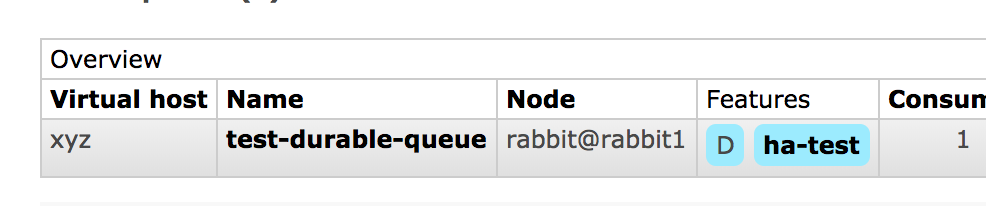
Now run the test application and kill the second node after it started consuming, notice the queue is migrated to the first node and it should be completely transparent to the application under test.
So with a HA policy it does smooth the experience for applications, and likely the consuming should continue just fine. (do note there can be data lose and re-deliver after a queue migration)
My Result
Before jumping to the conclusions, I want to talk a bit about my test applications and my final result.
My starting point is pretty much borrowed from the amqp package’s documentation. But turns out it doesn’t actually handle this situation.
During the test, I found issues like creating multiple connections, trying to create many channels and when the queue is back I have many consumers on a queue instead of just one, and when I just started it would even straight up crash when I kick the second node. Applying the test, the final code is pretty stable against cluster changes on RabbitMQ side, this could be referenced if you use Elixir to work with AMQP, it features:
- Reuse connection: no reconnect (recreation of
Connection) unless the connected node (on AMQP side) fails - Exactly one channel, and resilient to queue failure (queue down due to RabbitMQ cluster changes)
- Useful logging (with
lagerbecause it’s bundled withamqp_client) - Example of passing in options through
Supervisorlayers
Conclusions
For a durable queue, all it takes to redeclare the queue successfully is to not crash yourself before RabbitMQ corrects its cluster membership. And keep retrying (at a reasonable rate).
Then our test with HA queues showed that it indeed avoids the queue being unavailable for this period of time. However this does have some (probably negligible) performance impact, as every operation on a queue will need to be replicated to a second node. This is NOT distribution, ALL operations are still only handled by the master.
Another benefit of HA queues is it preserves bindings, this guarantees during the period of the dead node being removed, messages will still be routed to queues normally. In comparison, non-HA queues will be basically useless during this period. This sounds like you should apply HA policy all the time, but I think it depends on what kind of guarantee you want to have in your ecosystem.
Throughout this work, I also learnt a lot about various other aspects of AMQP/RabbitMQ:
When the queue fails, RabbitMQ can send basic.cancel, this requires configuration in client properties, luckily this is enabled by most client libraries by default, including amqp for Elixir, and py-amqp for Python - this gives us ability to react to channel cleanup and retry logic.
When HA queues failover, we can also request a cancellation. By default there’s no notification. Without the notification, it’s transparent to applications like in my test.
Finally, connection should be shared, channel should be bound to queue(s) - “fail as a unit”. I say “fail as a unit”, and it’s very much influenced by BEAM.
Try this example: say an application depends on 2 queues for an operation, it should use a single channel to consume both, then if any of the 2 queues fail, the channel should be stopped and only re-establish until it can successfully consume from both queues again. (In amqp_client used by my test application, this is helped by linked Erlang Process, at first I wonder whether I can “fix” it, but in the end I realize that is actually the correct way) Either way, my point is you should ensure similiar behaviour in your application/SDK.
Again, do note this is not common practice and if you need to consume different (kinds of) messages, consider using a single queue with multiple bindings first. Which is simpler to design around and implement.
For best performance though, you should use one connection for publishing and another one for consuming - because of TCP flow control, check out these excellent resources from CloudAMQP: a TL; DR version and several detailed post: one, two, three. There’s also a webinar if you prefer voice over text.
Additional Ideas
There are more test cases you can derive based on this local cluster.
First of all, we can simulate a netsplit, it’s very interesting to observe how a matured system like RabbitMQ reacts to this. Using docker network, it’s very easy to repro:
docker network disconnect rabbit rabbit2
It can take several minutes for the RabbitMQ cluster to recognize the netsplit, then it’s kind of similiar to the node down scenario. Now if we reconnect the network, the cluster will not automatically resolve - it actually recognizes netsplit has happened and notifies you that mnesia requires manual intervention to consolidate state. The queue will not be successfully declared (from the first node) during this.
docker network connect rabbit rabbit2

docker exec rabbit2 rabbitmqctl stop_app
docker exec rabbit2 rabbitmqctl reset
docker exec rabbit2 rabbitmqctl start_app
Then queue can be redeclared successfully. Honestly I didn’t play around too much with this, but feel free to try out different things here.
Another idea is to have a load balancer (HAProxy or Nginx) before the cluster, so you can test what happens if connect through the first node, consume from the second node, and then kill the first node. This is actually more like how connection works in our live (and dev) cluster.
One last point, throughout these test I didn’t publish anything to the cluster, so if you add some publishing and consuming activities, you can debug cases like data lose and re-delivery.